For the complete documentation index, see llms.txt. Prefer markdown by appending.mdto documentation URLs or sendingAccept: text/markdown.
Supabase
Learn how to set up Supabase for your TurboStarter project. Practical instructions you can apply directly to your web app.
Supabase is an open-source backend platform built on top of PostgreSQL that provides a managed database, storage, and other features out of the box.
You can adopt Supabase incrementally - start with just the pieces you need (for example, database only, or database + storage) and add more features over time. There's no requirement to integrate everything at once.
In this guide, we'll walk you through the process of setting up Supabase as a provider for your TurboStarter project. This could include using it as a database, storage, edge runtime for your API and more.
Prerequisites
Before you start, make sure you have:
- TurboStarter project cloned locally with dependencies installed (you can use our CLI to create a new project in seconds)
- Supabase account - you can create one at supabase.com
- Basic familiarity with the core database docs:
(Optional) Use Supabase locally with Docker
If you're on the Supabase free plan, you can only have a limited number of active hosted databases at once. A good workflow is:
- Use local Supabase for day-to-day development
- Keep one hosted Supabase project for staging/production (and for testing features that require a deployed project)
Supabase provides a local development stack that runs via Docker, managed by the Supabase CLI.
Install prerequisites
- Install Docker (Docker Desktop is the easiest option)
- Install the Supabase CLI (pick one):
- macOS (Homebrew):
brew install supabase/tap/supabase - npm (no global install):
npx supabase --version
- macOS (Homebrew):
Initialize and start Supabase locally
From the monorepo root:
supabase init
supabase start
Once it’s running, get the local URLs and credentials:
supabase statusYou should see a local DB URL (Postgres), plus URLs for Studio and the local API.
Default local DB URL
In most default setups, the local Postgres URL looks like:
postgresql://postgres:postgres@127.0.0.1:54322/postgres
Always prefer copying the exact value from supabase status to avoid port mismatches.
Point TurboStarter to the local database
Update the root .env.local so TurboStarter’s @workspace/db uses the local Postgres:
DATABASE_URL="postgresql://postgres:postgres@127.0.0.1:54322/postgres"Then run migrations (same as with hosted Supabase):
pnpm with-env pnpm --filter @workspace/db db:migrateThat’s it — TurboStarter now talks to your local Supabase Postgres.
Useful local commands
supabase stop        # stop containers
supabase start       # start again
supabase status      # show URLs/ports/keys
supabase db reset    # reset local DB (drops data)
Create a new Supabase project
- Go to the Supabase dashboard.
- Create a new project (choose a strong database password and a region close to your users).
- Supabase will automatically provision a PostgreSQL database for you.

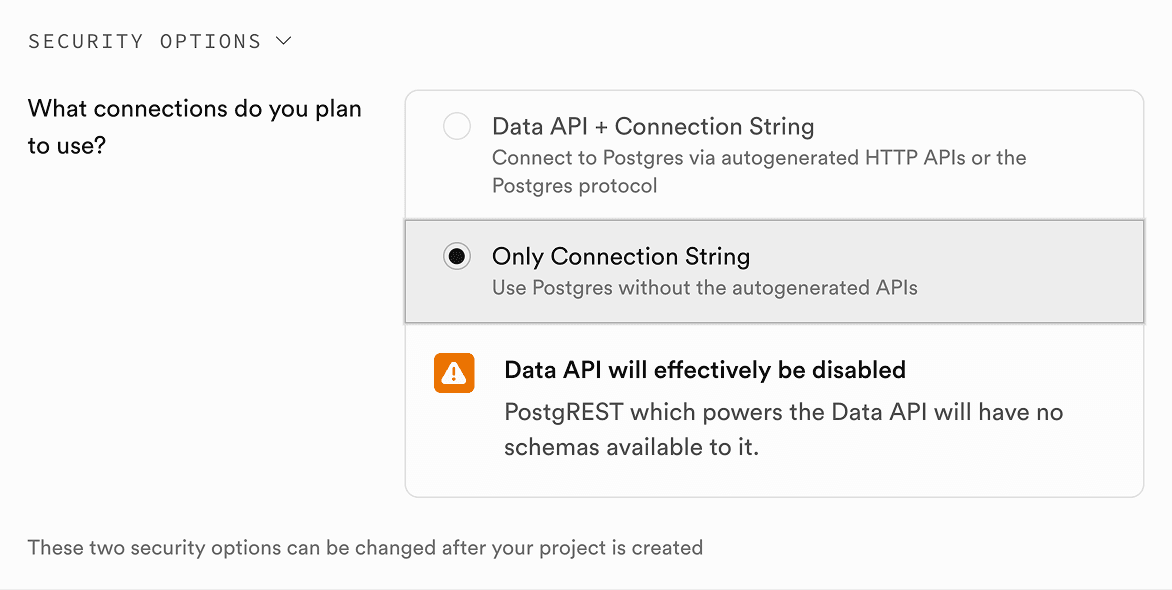
Optionally, you can customize the Security options by choosing the Only Connection String option - it will opt out of autogenerating API for tables inside your database. It's not needed for TurboStarter setup, but of course you can still leverage it for your custom use-cases.
Once the project is ready, you can fetch the connection string.
Get the database connection string
In the Supabase dashboard:
- Open your project.
- Click on the Connect button at the top.
- Locate the connection string for your chosen ORM (it will be under the ORMs tab).
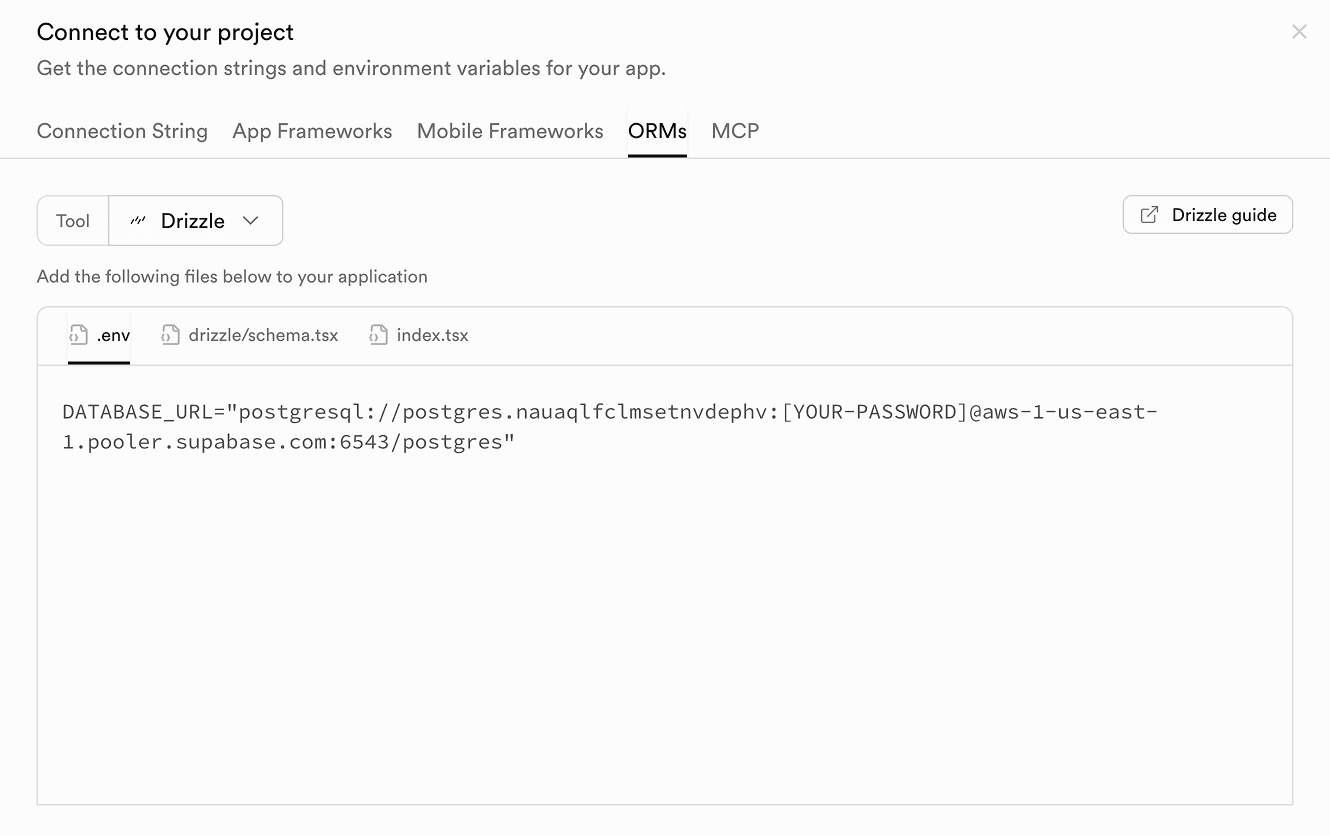
Copy this value - you'll use it as your DATABASE_URL.
Replace password placeholder
In your Supabase connection string, you can see a placeholder like [YOUR-PASSWORD]. Make sure to replace this with the actual password you set when creating your Supabase project.
Configure environment variables
TurboStarter reads database connection settings from the root .env.local file and uses them inside the @workspace/db package.
Create (or update) the .env.local file in the monorepo root:
DATABASE_URL="postgres://postgres.[YOUR-PROJECT-REF]:[YOUR-PASSWORD]@aws-0-[aws-region].pooler.supabase.com:6543/postgres?pgbouncer=true&connection_limit=1"Replace:
YOUR-PROJECT-REFwith your Supabase project refYOUR-PASSWORDwith the database password you set when creating the projectaws-regionwith the region shown in the Supabase connection string
These variables are validated in the @workspace/db package and used to create Drizzle client for your database.
For more background on how DATABASE_URL is used, see Database overview.
Setup your Supabase database
With DATABASE_URL now pointing to Supabase, you can apply the existing TurboStarter schema to your Supabase database.
From the monorepo root, run:
pnpm with-env pnpm --filter @workspace/db db:migrateThis will:
- Use your Supabase
DATABASE_URLfrom.env.local - Run all pending SQL migrations from
packages/db/migrations - Create the full TurboStarter schema (users, billing, demo tables, etc.) in Supabase
If you're actively iterating on the schema, you can generate new migrations and apply them as described in Migrations.
Seeding your database
After running your migrations, you may want to seed your database with initial data (such as demo users or organizations). You can do this by running the following command:
pnpm with-env pnpm turbo db:seedThis will populate your Supabase database with some example data you can use to test your application.
Use Supabase Storage as S3-compatible storage
TurboStarter's storage layer is designed to work seamlessly with any S3-compatible provider. In this section, we'll show how to use Supabase Storage as your application's file storage back-end.
Supabase Storage provides a simple, S3-compatible API and is a great choice if you're already using Supabase for your database.
Create a storage bucket
- In the Supabase dashboard, go to Storage → Buckets.
- Click Create bucket (name it whatever you want, for example
avatarsoruploads). - Adjust settings based on your needs (e.g. limit the maximum file size, specify the allowed file types, etc.)
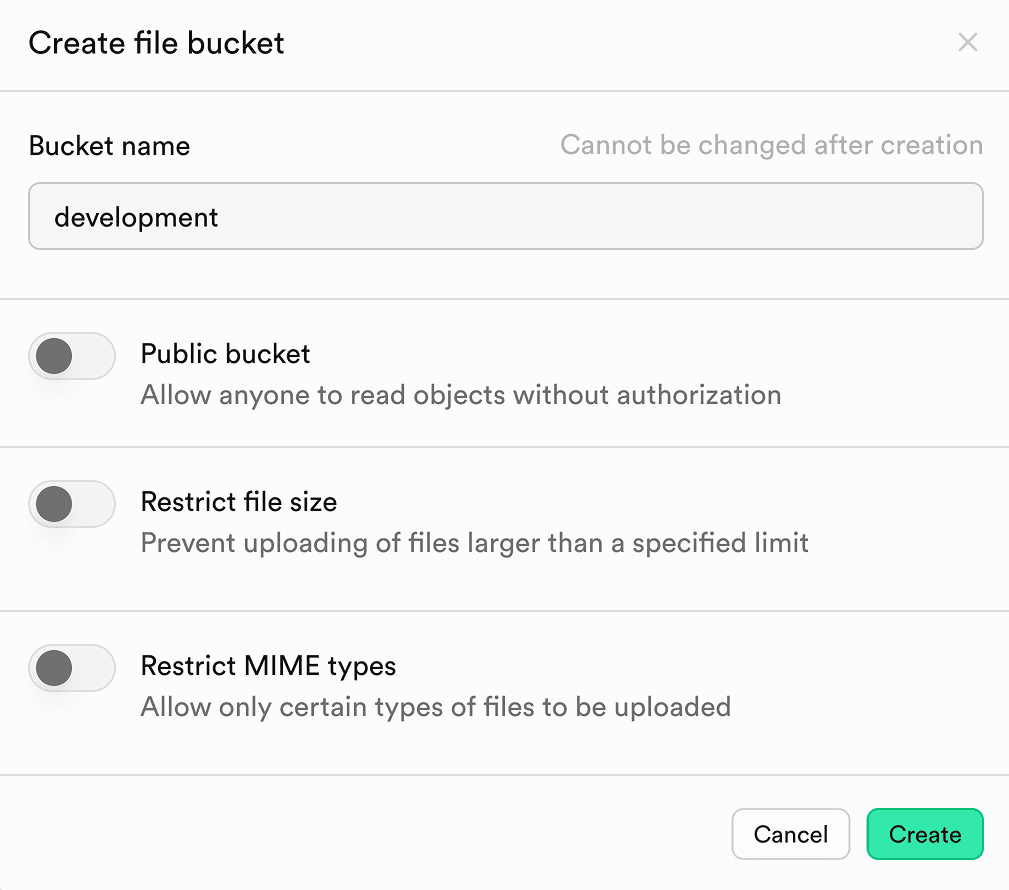
You can create multiple buckets (for documents, images, videos, etc.) if needed.
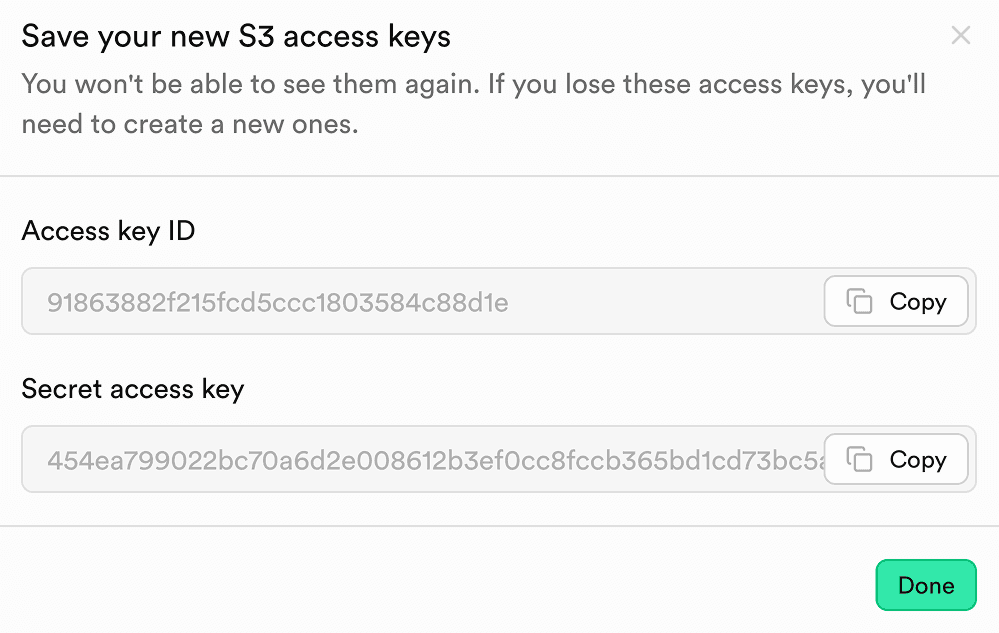
Generate S3 access keys in Supabase dashboard
- Go to Storage → S3 → Access keys.
- Click New access key.
- Give it a descriptive name and create the key.
- Copy the Access key ID and Secret access key to use in your application.
Configure S3 environment variables for Supabase Storage
In your weba application's .env.local, add (or update) the S3 configuration used by TurboStarter's storage layer:
S3_REGION="us-east-1"
S3_BUCKET="avatars"
S3_ENDPOINT="https://[YOUR-PROJECT-REF].supabase.co/storage/v1/s3"
S3_ACCESS_KEY_ID="your-access-key-id"
S3_SECRET_ACCESS_KEY="your-secret-access-key"
These variables integrate directly with the storage configuration described in:
Once set, existing TurboStarter file upload flows (e.g. user avatars, organization logos) will use Supabase Storage via presigned URLs.
Run your API on Supabase Edge Functions
As we're using a Hono as our API server, you can deploy it as a Supabase Edge Function so it runs close to your users.
At a high level:
- Install the Supabase CLI and initialize a Supabase project locally with
supabase init. - Create a new Edge Function (for example
hono-backend) withsupabase functions new hono-backend. - Inside the generated function (for example
supabase/functions/hono-backend/index.ts), set up a basic Hono app and export it viaDeno.serve(app.fetch):
import { Hono } from "jsr:@hono/hono";

// change this to your function name
const functionName = "hono-backend";
const app = new Hono().basePath(`/${functionName}`);

app.get("/hello", (c) => c.text("Hello from hono-server!"));

Deno.serve(app.fetch);- Run the function locally with
supabase startandsupabase functions serve --no-verify-jwt, then call it from your TurboStarter app using the local or deployed function URL. - When you're ready, deploy the function with
supabase functions deploy(orsupabase functions deploy hono-backend) and manage it using the Supabase dashboard, as described in the Supabase Edge Functions docs.
This is entirely optional, but it's a great fit for lightweight APIs, webhooks, and other serverless logic you want to run alongside your Supabase project.
Explore additional Supabase features
Supabase is a full Postgres development platform, so beyond the database and storage pieces wired up above you can gradually add more features as your app grows (see the Supabase homepage for an overview).
Some features that fit especially well with TurboStarter's design are:
- Realtime - built on Postgres replication, so you can stream changes from your existing TurboStarter tables (inserts, updates, deletes) into live UIs without changing how you manage schema or RLS. You still define tables and policies via
@workspace/db, and opt into Realtime on top. - Vector - powered by the pgvector extension and stored in regular Postgres tables, making it easy to integrate semantic search or AI features while keeping everything in the same migrations and Drizzle models you already use in TurboStarter. We're using it extensively in our dedicated AI Kit.
- Cron - enables you to schedule background jobs and periodic tasks with pg_cron. You can define cron jobs for things like scheduled database cleanups, sending emails, report generation, or any recurring logic, all managed alongside your TurboStarter app with full Postgres integration.
Because these features are all layered on top of Postgres, you can introduce them incrementally and keep managing everything through your familiar workflow.
Start the development server
With the database and other services configured to use Supabase, you can start TurboStarter as usual from the monorepo root:
pnpm devTurboStarter will now:
- Use Supabase Postgres as your database through
DATABASE_URL - Use Supabase Storage as your file storage through the S3-compatible endpoint
- Leverage Supabase Edge Functions (for example, with Hono) for your serverless backend
That's it! You can now start building your application with Supabase as your main provider. Explore the Supabase documentation for more features and best practices.
How is this guide?
Last updated on