For the complete documentation index, see llms.txt. Prefer markdown by appending.mdto documentation URLs or sendingAccept: text/markdown.
Push notifications
Configure push notifications in TurboStarter - permissions, push tokens, FCM/APNs credentials, testing, and sending at scale.
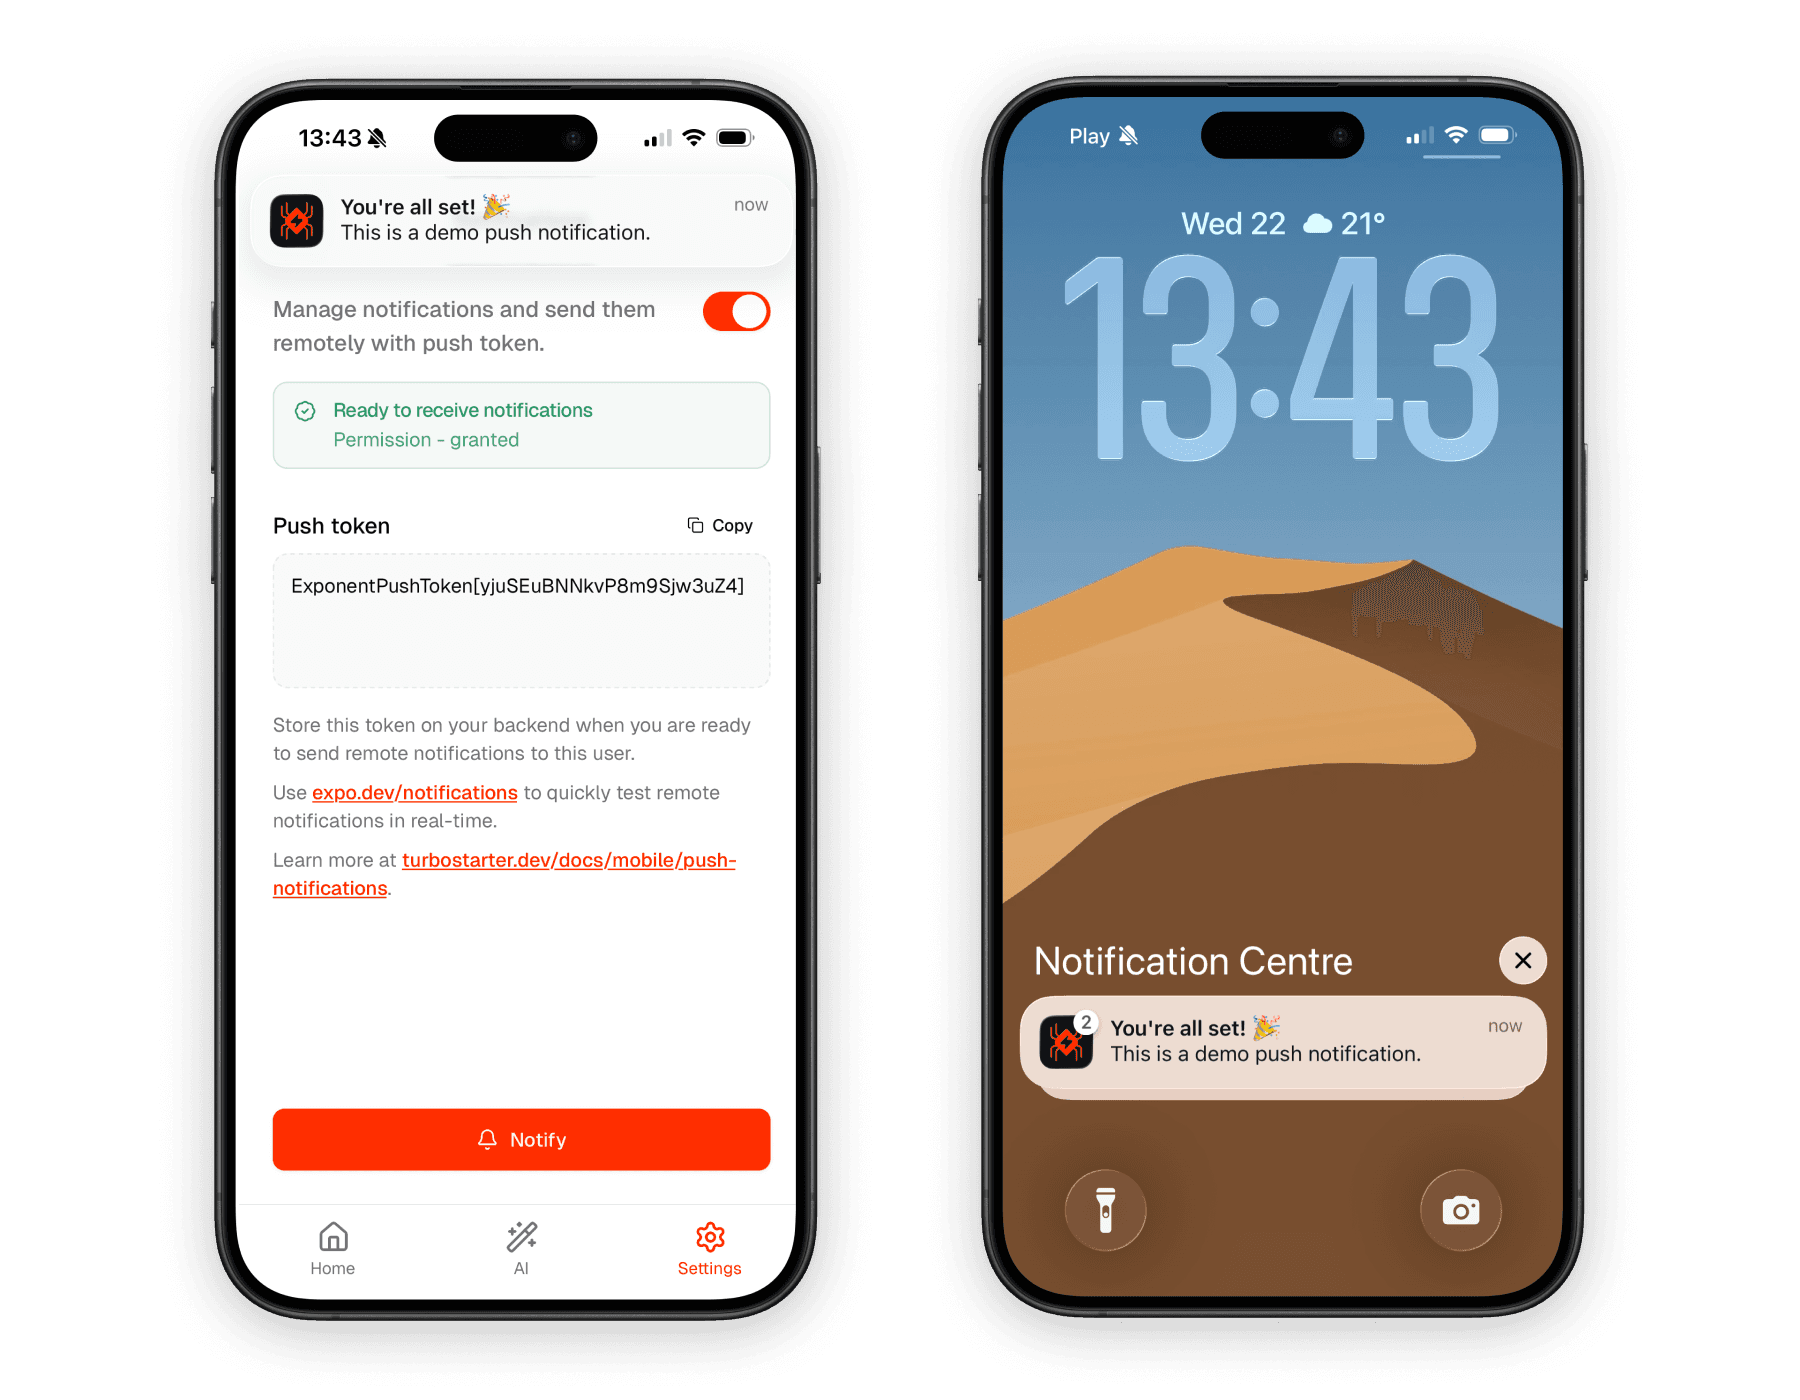
TurboStarter ships with expo-notifications wired into the mobile app so you can request permission, obtain a push token, handle foreground delivery, and send remote notifications through the push notification service.
Under the hood, delivery goes through FCM on Android and APNs on iOS. You work with push tokens on the client and call the HTTP API (or an SDK) from your backend - no need to talk to FCM/APNs directly unless you want finer-grained control later.
Development build required
Remote push notifications do not work in Expo Go on recent SDKs. Use a development build (or a store build) on a physical device, an Android emulator with Google Play services, or an iOS Simulator on Xcode 14+ / macOS 13+ / iOS 16+.
Architecture
Out of the box, TurboStarter includes:
- The
expo-notificationsconfig plugin (Android notification icon, default channel, accent color) - A
NotificationsProviderthat sets the foreground handler and listens for receive / response events useNotificationsPermissionsandusePushTokenhooks- A settings screen under Dashboard → Settings → Notifications to enable permissions, copy the push token, and fire a local test notification
Token persistence on your backend is intentionally left to you - see Send from your backend.
Configuration
Most of this is already set up. Adjust it when you change branding, channels, or your EAS / Firebase project.
Config plugin
The config plugin registers native notification behavior. Customize the Android icon (96×96, white on transparent), default channel, and accent color in app.config.ts:
export default ({ config }: ConfigContext): ExpoConfig => ({
  ...config,
  plugins: [
    // ...
    [
      "expo-notifications",
      {
        icon: "./public/images/icon/android/notification.png",
        defaultChannel: "default",
        color: "#0D121C",
        // Optional: custom sounds, background remote notifications, etc.
        // sounds: ["./assets/notification.wav"],
        // enableBackgroundRemoteNotifications: false,
      },
    ],
  ],
});
After changing plugin options, rebuild the native app (eas build or a local prebuild). Config plugin changes are not applied by OTA updates alone.
Notification config plugin
docs.expo.dev
Project ID
Push tokens are scoped to your EAS project. TurboStarter reads the ID from app config:
Constants.expoConfig?.extra?.eas?.projectId ?? Constants.easConfig?.projectId;Keep extra.eas.projectId in sync with your EAS project in app.config.ts. If the project ID is missing, fetching a push token will fail.
Android: FCM credentials
Android delivery requires Firebase Cloud Messaging (FCM V1):
- Create or reuse a Firebase project and add an Android app with your package name (for example
com.turbostarter.core). - Download
google-services.jsonand pointandroid.googleServicesFileat it inapp.config.ts(already wired in TurboStarter). - In Firebase → Project settings → Service accounts, generate a new private key (JSON).
- Upload that service account key to EAS as the FCM V1 credential:
eas credentials
# Android → your build profile → Google Service Account
# → Manage Google Service Account Key for Push Notifications (FCM V1)
You can also upload the key in the EAS dashboard under Project → Credentials.
Do not commit the private service account JSON. google-services.json itself is public-facing and may be committed.
iOS: APNs credentials
A paid Apple Developer account is required.
On the first iOS eas build, answer yes when EAS asks to set up push notifications and generate an Apple Push Notifications key. You can also manage credentials anytime:
eas credentials
# iOS → your build profile → Push Notifications
Register the physical device you use for development before building, if you haven't already.
Permissions and tokens
Permissions
Use useNotificationsPermissions to read and request notification permission. On Android it creates the default channel before requesting permission (required for the system prompt on Android 8+):
import { useNotificationsPermissions } from "~/modules/common/hooks/notifications/use-notifications-permissions";

export const Example = () => {
  const { isGranted, isLoading, request, status } =
    useNotificationsPermissions();

  // Call request() after a contextual prompt, or wire isGranted into a Switch
};
Ask for permission in context (after the user understands the value), not on cold start. If the user denies, open system settings with Linking.openSettings() - the settings screen already does this when toggling off or when status is denied.
Push token
Once permission is granted, usePushToken fetches a push token for the device:
import { usePushToken } from "~/modules/common/hooks/notifications/use-push-token";

export const Example = () => {
  const { token, isLoading, getToken } = usePushToken();

  // Persist `token` to your backend when the user is authenticated
};
Store the token server-side, keyed by user (and ideally device / install). Refresh it when:
- the user grants permission
- the app comes to the foreground after a reinstall
- your backend reports
DeviceNotRegisteredfor that token
Foreground handling
NotificationsProvider sets a global handler so notifications can show a banner / appear in the notification center while the app is open, and registers listeners for receive and tap events:
Notifications.setNotificationHandler({
  handleNotification: async () => ({
    shouldPlaySound: false,
    shouldSetBadge: false,
    shouldShowBanner: true,
    shouldShowList: true,
  }),
});
Customize sound, badge, and deep-link behavior in this provider (or in the response listener) to match your product—for example navigate to a screen when response.notification.request.content.data contains a route.
Test notifications
In the app
Open Settings → Notifications, enable permission, then tap Notify to schedule a local notification (trigger: null). That validates the permission flow and foreground handler without going through a remote push service.
Copy the push token from the same screen when you are ready to test remote delivery.
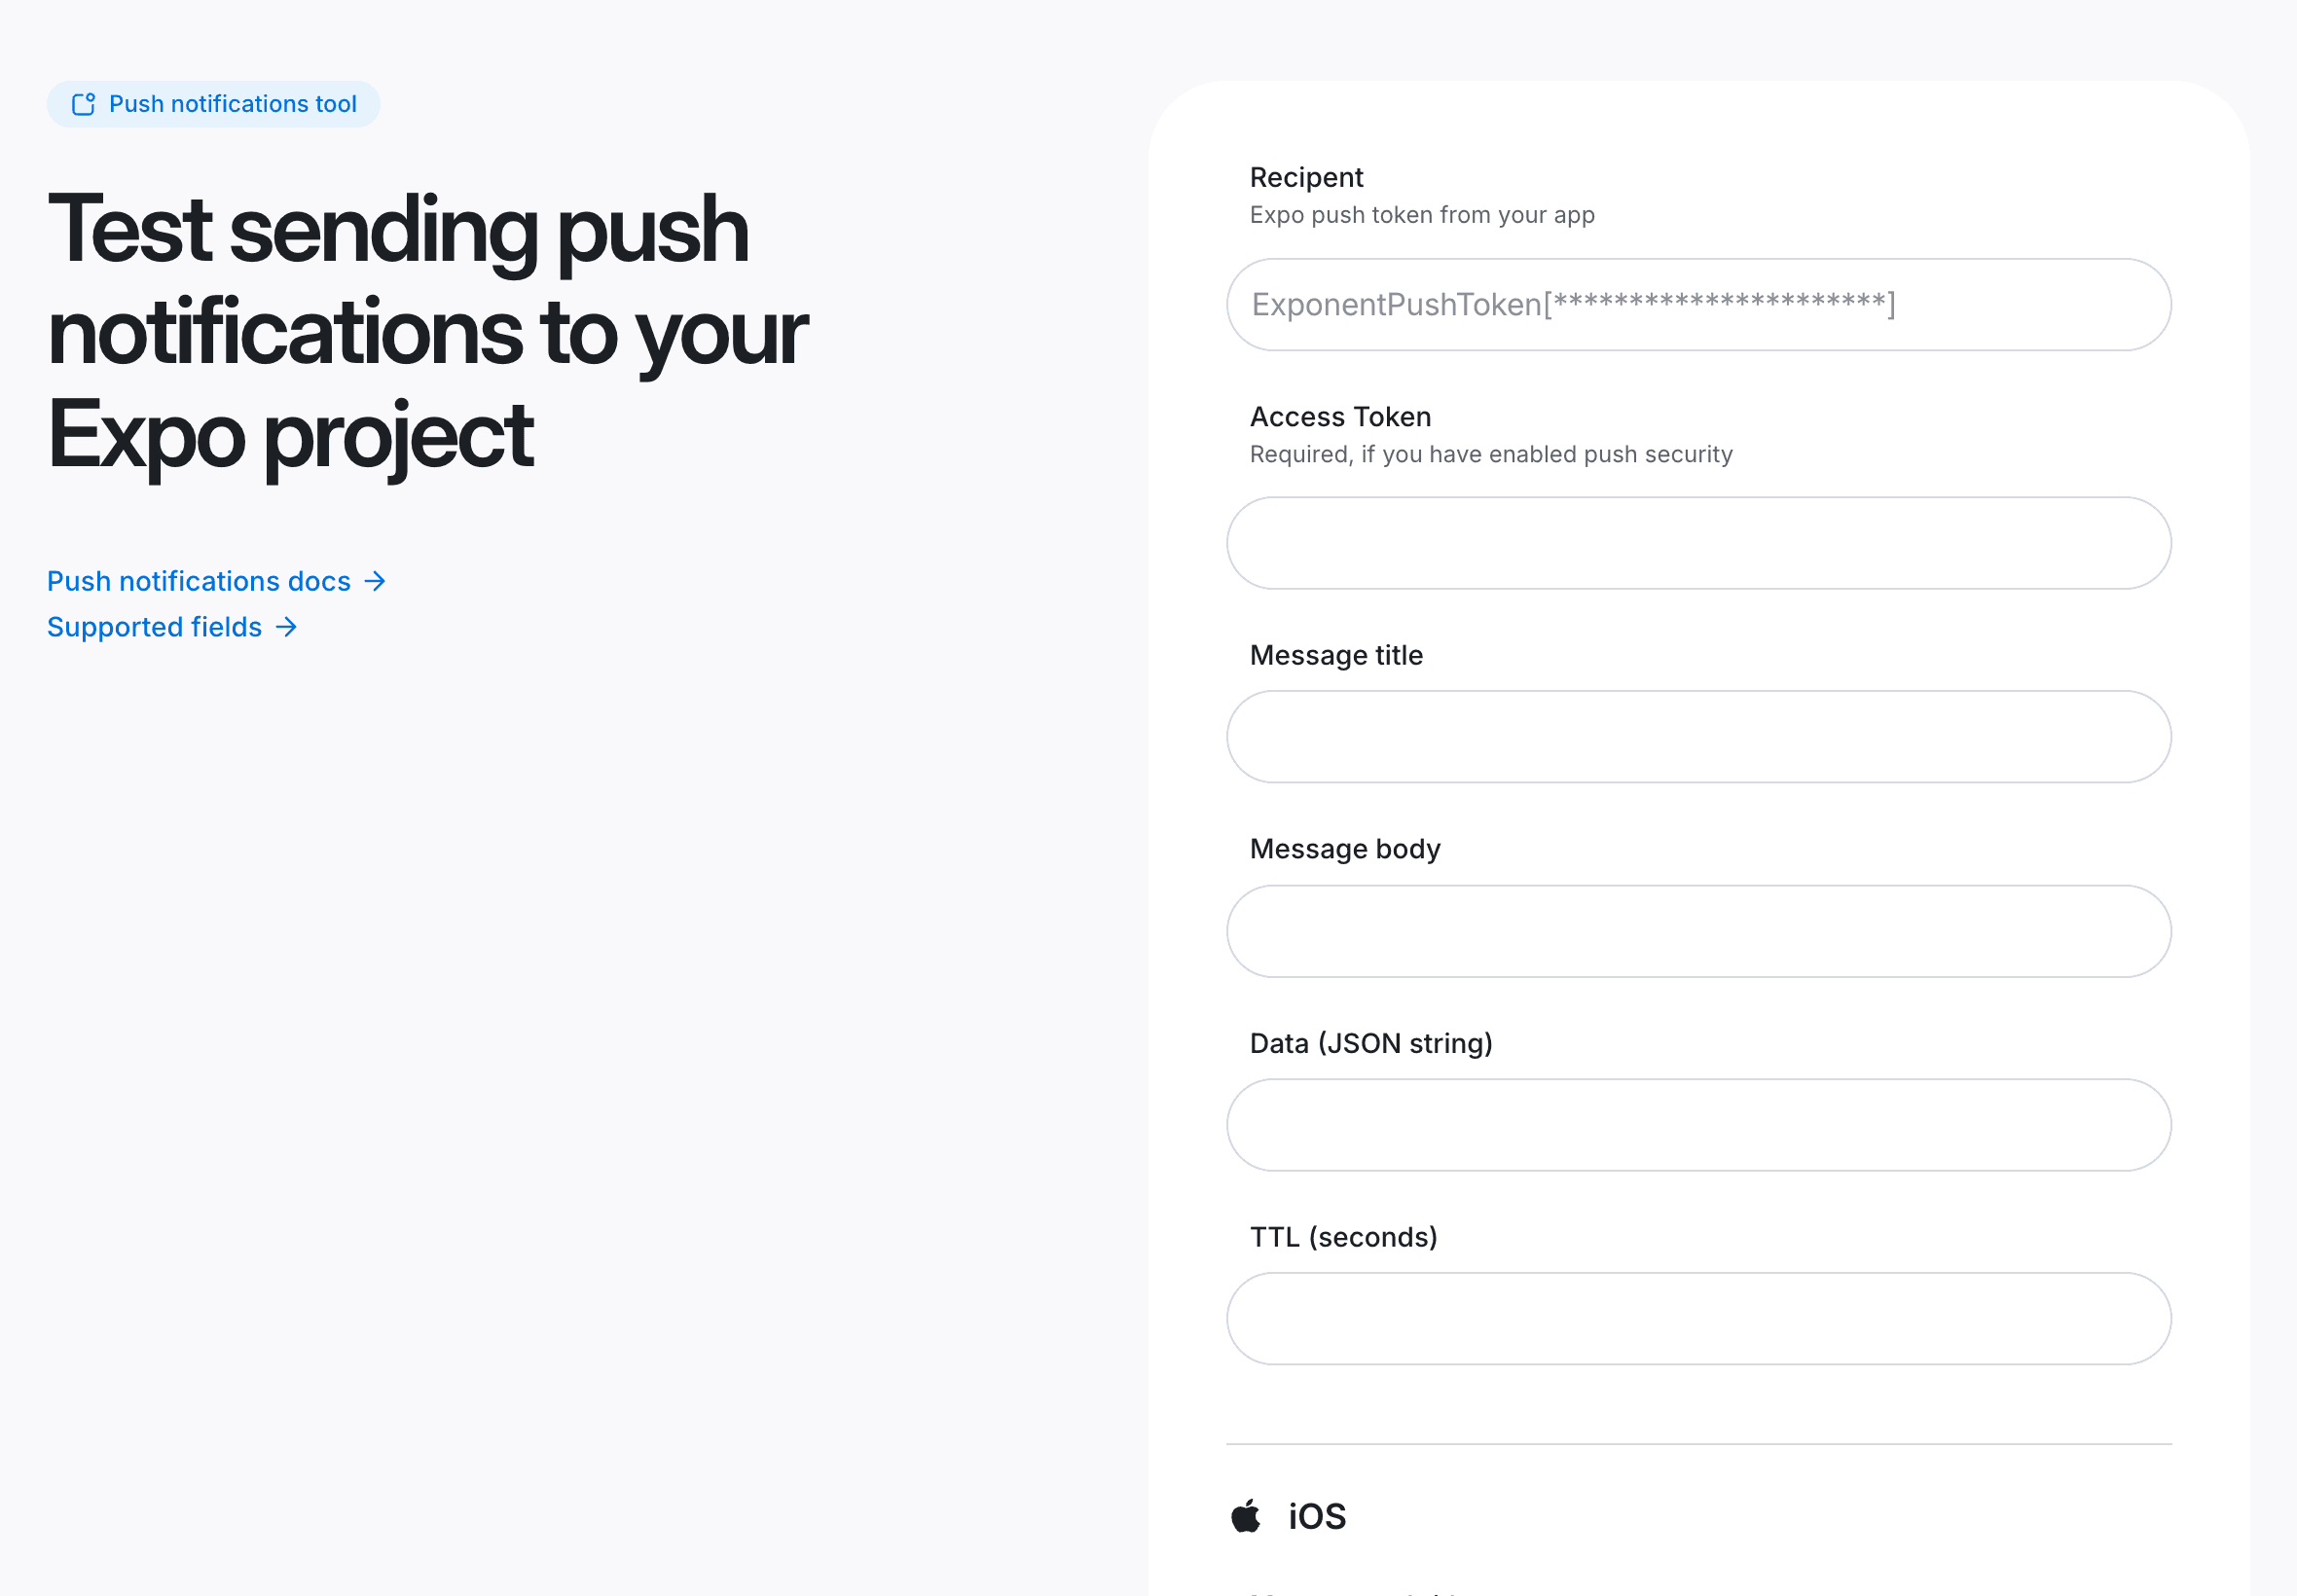
Push notifications tool
Paste the token into the push notifications tool, set a title and body, and send. You should see the notification on the device within a few seconds.
Local vs remote
Notify in settings is a local notification on the device. The push tool (and your backend) send remote pushes through the push service → FCM/APNs. Both paths share the same permission and display configuration.
Send from your backend
There is no built-in API route for storing tokens yet. When you are ready to send remotely:
- Persist each user's push token(s) from the mobile app (for example after login or when
usePushTokenresolves). - Send messages to the push API from your server.
Quick test with cURL
curl -H "Content-Type: application/json" -X POST "https://exp.host/--/api/v2/push/send" -d '{
  "to": "ExponentPushToken[xxxxxxxxxxxxxxxxxxxxxx]",
  "title": "Hello",
  "body": "World",
  "data": { "url": "/dashboard" }
}'
Node SDK (recommended)
Prefer the official expo-server-sdk for batching, gzip, and connection limits:
import { Expo, type ExpoPushMessage } from "expo-server-sdk";

const expo = new Expo();

const messages: ExpoPushMessage[] = [
  {
    to: "ExponentPushToken[xxxxxxxxxxxxxxxxxxxxxx]",
    title: "Hello",
    body: "World",
    data: { url: "/dashboard" },
    sound: "default",
  },
];

const chunks = expo.chunkPushNotifications(messages);

for (const chunk of chunks) {
  const tickets = await expo.sendPushNotificationsAsync(chunk);
  // Store ticket IDs, then fetch receipts later
}
You can wire this into a Hono route, a background job, or any server path that already runs in TurboStarter.
Send notifications with the push service
docs.expo.dev
Message payload tips
Push notifications let you engage users by sending alerts even when your app isn't open. Below are tips for crafting your notification messages and details about the payload fields used in push requests. Understanding these will help you create effective, user-friendly notifications.
| Field | Notes |
|---|---|
to | One token, or an array of tokens (same project) |
title / body | User-visible copy; localize on the server when possible |
data | Opaque JSON for deep links / actions—avoid secrets |
sound / badge | Platform-dependent; keep defaults conservative |
channelId | Android only; must match a channel you created (TurboStarter uses default) |
Batch up to 100 messages per request. Prefer arrays over one HTTP call per user.
Scale and reliability
The push service is free to use with a rate limit of about 600 notifications per second per project. Past that, requests fail until you slow down - throttle and retry on your server.
Follow these patterns so delivery stays reliable as you grow:
- Limit concurrency - the Node SDK caps concurrent connections (six by default). Don't open unbounded parallel
fetchcalls. - Retry transient failures - network errors, HTTP 429, and 5xx should use exponential backoff.
- Check push receipts - a ticket
status: "ok"only means the service accepted the message. After ~15 minutes, callgetReceiptswith ticket IDs. Receipts expire after 24 hours. - Drop dead tokens - if a receipt (or ticket) returns
DeviceNotRegistered, delete that token from your database until the device re-registers. - Gzip large batches - the Node SDK does this for you; raw HTTP clients can send gzip bodies to reduce upload size.
- One project per request - do not mix push tokens from different EAS projects in the same send call.
For very large fan-out (marketing blasts, digests), queue work in a background job and process chunks over time rather than blocking a request handler.
No SLA
The push service does not publish an SLA, and FCM/APNs can have outages. Design for eventual delivery and make critical alerts (billing, security) resilient with email or in-app fallbacks when needed.
Customization
Android channels
Channels control importance, sound, and whether the user can mute a category. TurboStarter creates a single default channel. Add more for transactional vs marketing traffic:
await Notifications.setNotificationChannelAsync("marketing", {
  name: "Marketing",
  importance: Notifications.AndroidImportance.DEFAULT,
});

await Notifications.setNotificationChannelAsync("account", {
  name: "Account",
  importance: Notifications.AndroidImportance.MAX,
});
Pass channelId in the push payload so Android routes the message correctly. Keep channel IDs stable—users' mute preferences stick to the ID.
Deep links and tap handling
Extend the response listener in NotificationsProvider (or a dedicated hook) to navigate when the user taps a notification:
Notifications.addNotificationResponseReceivedListener((response) => {
  const url = response.notification.request.content.data?.url;
  // router.push(url) — validate against an allowlist
});
Only put non-sensitive identifiers in data; load full content from your API after open. For schemes, Universal Links, and App Links setup, see Deep linking.
Direct FCM / APNs
If you need to talk to FCM or APNs yourself (custom features, existing notification infra), call Notifications.getDevicePushTokenAsync() instead of getExpoPushTokenAsync() and send from your own integration. The permission and display APIs stay the same.
Send notifications with FCM and APNs
docs.expo.dev
Multiple environments
Use separate EAS projects or application IDs for development / preview / production so tokens and credentials never cross environments. See Multiple environments.
Troubleshooting
| Symptom | What to check |
|---|---|
No token / Project ID not found | extra.eas.projectId in app.config.ts matches your EAS project |
| Android never prompts | Create the notification channel before requestPermissionsAsync (already done in the hook) |
| Remote push fails on Android | FCM V1 service account uploaded to EAS; googleServicesFile set; package name matches Firebase |
| Remote push fails on iOS | APNs key via eas credentials; paid Apple team; rebuild after enabling push |
| Works in debug, not release | Production credentials must be your own FCM/APNs keys |
| Token accepted but no banner | Foreground handler flags; Android channel importance; Do Not Disturb / app notification settings |
How is this guide?
Last updated on